本文
芯片验证系列文章主要分为三部分:验证工程师与芯片验证、SV学习笔记、UVM学习笔记。此为 UVM学习笔记 部分第二篇,主要介绍核心基类、phase机制、config机制和消息管理。
| 版本 | 说明 |
|---|---|
| 0.1 | 初版发布 |
参考
| 名称 | 作者 | 来源 |
|---|---|---|
| 《芯片验证漫游指南》 | 刘斌 | 书籍 |
| 《UVM实战》 | 张强 | 书籍 |
专业术语与缩略语
| 缩写 | 全称 | 说明 |
|---|---|---|
核心基类
uvm_object
- UVM世界中的类最初都是从一个uvm_void根类(root class) 继承来的,而实际上这个类并没有成员变量和方法。
- uvm_void只是一个虚类(virtual class),还在等待将来继承于它的子类去开垦。在继承于uvm_void的子类中,有两个类, 一个为uvm_object类,另外一个为uvm_port_base类 。
- 在UVM世界的类库地图中除了事务接口(transaction interface)类继承于uvm_port_base,其它所有的类都是从uvm_object类一步步继承而来的。
- 从uvm_object提供的方法和相关的宏操作来看,它的核心方法主要提供与数据操作的相关服务:
- Copy
- Clone
- Compare
- Pack/Unpack
- 在SV模块的学习中,懂得了什么是句柄拷贝和对象拷贝。因此,无论是copy或者clone,都需要确保在操作的过程中,需要有source object和target object。
域的自动化(field automation)
- 从UVM通过域的自动化,使得用户在注册UVM类的同时也可以 声明今后会参与到对象拷贝、克隆、打印等操作的成员变量 。
- 域的自动化解放了verifier的双手,这使得在使用uvm_object提供的一些预定义方法时,非常便捷,而无需再实现自定义方法。
- 在了解了 域的自动化常用的宏 之后,用户需要考虑哪些成员变量在注册UVM类(`uvm_{component/object}_utils) 的时候,也一并将它们归置到对应的域列表中,以便为稍后的域方法提供可以自动实现的基础。
|
|
- 从这个域的自动化宏的例子来看,在注册box的同时,也声明了将来会参与到uvm_object数据操作的成员变量。
- 凡是声明了的成员变量,都将在数据操作时自动参与进来。
- 如果有一些数据没有通过域的自动化来声明的话,它们也将不会自动参与到数据的拷贝、打印等操作,除非用户自己去定义这些数据操作方法。
- 所以对于新手,请养成习惯,即:
- 在注册component或者object的时候,使用`uvm_{component/object}_utils_begin和`uvm_{component/object}_utils_end来配对包裹接下来的域的自动化。
- 域的自动化为了尽量识别多数的变量,以及做相应的处理,对应的宏的种类非常多,但是也不需要额外的担心,你可以使用红宝书来查各种域的自动化时所对应的宏。
- 域的自动化的相关宏都是`uvm_field_{int/object/string/enum/event/real…}{ARG,FLAG}。ARG表示成员变量,FLAG表示用来标记的数据操作。
- FLAG的具体表示可以参照红宝书的表10.3,初学者只需要默认采取UVM_ALL_ON或者UVM_DEFAULT,即将所有的数据操作方法都打开。
- 常见的数据操作方法,包括之前所介绍的copy,compare,print,record,pack和其它。将在接下来的部分逐一介绍这些数据操作方法。
拷贝(copy)
- 在UVM的数据操作中,需要 对copy和clone加以区分 。前者默认已经创建好了对象,只需要对数据进行拷贝;后者则会自动创建对象并对source object进行数据拷贝,再返回target object句柄。
- 无论是copy或者clone,都需要对数据进行复制。
- 但是如果数据成员包括句柄,那么拷贝的时候,是否只拷贝该成员句柄本身,还是也额外创建新的对象,拷贝该句柄指向的对象?
- 从示例可以看到,在进行copy时,默认进行的是深拷贝(deep copy) ,即会执行copy()和do_copy() 。
|
|
- 新添加了一个类ball,并且在box中例化了一个ball的对象。在拷贝过程中,box的其它成员都正常拷贝了,但对于box::b的拷贝则通过了ball的深拷贝方式进行。
- 即先执行自动拷贝copy(),来拷贝允许拷贝的域,由于ball::color不允许拷贝,所以只拷贝了ball::diameter。
- 接下来,再执行do_copy()函数,这个函数是需要用户定义的回调函数(callback function) ,即在copy()执行完后会执行do_copy() 。
- 如果用户没有定义该函数,那么则不会执行额外的数据操作。从ball::do_copy()函数可以看到,如果被拷贝对象的diameter小于20,那么则将自身的diameter设置为20。因此,最后对象b2.b的成员与b1.b的成员数值不同。
比较(compare)
|
|
- 默认情况下,如果不对比较的情况作出额外配置,用户可以在调用compare()方法时,省略第二项参数,即采用默认的比较配置。
- 比较方法经常会在两个数据类中进行。例如从generator产生的一个transaction(数据类) ,和在设计输出上捕捉的transaction(数据类) ,如果它们为同一种类型,除了可以自定义数据比较之外,也可以直接使用uvm_object::compare()函数来实现数据比较和消息打印。
|
|
- 在上面的两个对象比较中,会将每一个自动化的域进行比较,所以在执行compare()函数时,内置的比较方法也会将比较错误输出。
- 从结果来看,比较发生了错误,返回0值。那么,b1.color和b2.color虽然不相同,为什么没有比较错误的信息呢?
- 原因在于,默认的比较器,即uvm_package::uvm_default_comparer最大输出的错误比较信息是1,也就是说当比较错误发生时,不会再进行后续的比较。
- 实际上,在uvm_object使用到的方法compare()、print()和pack(),如果没有指定数据操作配置对象作为参数时,会使用在uvm_pkg中例化的全局数据操作配置成员。
全局对象
- 在uvm_pkg中例化了不少全局对象,而在本节中我们会使用到的全局配置对象包括有uvm_default_comparer,uvm_default_printer和uvm_default_packer。
- 如果用户不想使用默认的比较配置,而是想自己对比较进行设定,可以考虑创建一个uvm_comparer对象,或者修改全局的uvm_comparer对象。
打印(print)
- 打印方法是核心基类提供的另外一种便于开发和调试的功能。
- 通过field automation,使得声明之后的各个成员域会在调用uvm_object::print()函数时自动打印出来。
- 相比于在仿真中设置断点,逐步调试,打印是另外一种调试方式。它的好处在于可以让仿真继续进行, 会在最终回顾执行过程中,从全局理解执行的轨迹和逻辑 。
|
|
- 只要在field automation中声明过的域,在稍后的print()函数执行时,都将打印出它们的类型、大小和数值。如果用户不对打印的格式做出修改,那么在打印时,UVM会按照uvm_default_printer规定的格式来打印。
- uvm_pkg所包含的用于打印的全局对象,它们分别是:
- uvm_default_tree_printer:可以将对象按照树状结构打印。
- uvm_default_line_printer:可以将对象数据打印到一行上面。
- uvm_default_table_printer:可以将对象按照表格的方式打印。
- uvm_default_printer:UVM环境默认的打印设置,该句柄默认指向了uvm_default_table_printer。
- 通过给全局打印uvm_default_printer赋予不同的打印句柄,就可以在调用任何uvm_object的print()方法时,得到不同的打印格式。
打包和解包(pack & unpack)
|
|
- pack是为了将自动化声明后的域(标量) 打包为比特流(bit stream) 。即将各个散乱的数据,整理到bit数据串中,类似于struct packed的整理方式,但又能充分利用数据空间,也更容易与硬件之间进行数据传递和比对。
- unpack与pack相反,即将串行数据解包变为原有的各自域。该操作适用于从硬件一侧接收串行数据,进行校验之后,还原为软件一侧对象中各自对应的成员变量。
- pack与unpack在通常的UVM环境中使用较少,但是 当与外界环境,例如System C发生大规模数据传递,该方法是首选 ,因为可以通过简单数据流实现精确的数据传输,另外,在UVM与FPGA、emulator之间进行数据交换时,该方法也由于简便得到了青睐。
|
|
phase机制
写在前头
- SV的验证环境构建中,传统的硬件设计模型在仿真开始前,已经完成例化和连接了;而SV的软件部分对象例化则需要在仿真开始后执行。
- 虽然对象例化通过调用构建函数new()来实现,但是单单通过new()函数无法解决一个重要问题,那就是 验证环境在实现层次化时,如何保证例化的先后关系,以及各个组件在例化后的连接 。
- 如果需要实现高级功能,例如在顶层到底层的配置时,SV也无法在底层组件例化之前完成对底层的配置逻辑。
- 因此UVM在验证环境构建时,引入了phase机制,通过该机制我们可以很清晰地 将UVM仿真阶段层次化 。
- 这里的层次化, 不单单是各个phase的先后执行顺序,而且处于同一phase中的层次化组件之间的phase也有先后关系 。
- 如果暂时抛开phase的机制剖析,对于UVM组件的开发者而言,他们主要关心各个phase执行的先后顺序。
- 在定义了各个phase虚方法后,UVM环境会按照phase的顺序分别调用这些方法。
| phase | 函数/任务 | 执行顺序 | 功能 | 典型应用 |
|---|---|---|---|---|
| build | 函数 | 自顶向下 | 创建和配置测试平台的结构 | 创建组件和寄存器模型,设置或者获取设置 |
| connect | 函数 | 自底向上 | 建立组件之间的连接 | 连接TLM的接口,连接寄存器模型和adapter |
| end_of_elaboration | 函数 | 自底向上 | 测试环境的微调 | 显示环境结构、打开文件,为组件添加额外配置 |
| start_of_simulation | 函数 | 自底向上 | 准备测试环境的仿真 | 显示环境结构、设置断点,设置初始运行时的配置值 |
| run | 任务 | 自底向上 | 激励设计 | 提供激励、采集数据、数据比较 |
| extract | 函数 | 自底向上 | 从测试环境中收集数据 | 从测试平台提取剩余数据,从设计观察最终状态 |
| check | 函数 | 自底向上 | 检查任何不期望的行为 | 检查不期望的数据 |
| report | 函数 | 自底向上 | 报告测试数据 | 报告测试结果,并将其写入文件中 |
| final | 函数 | 自顶向下 | 完成测试活动、结束仿真 | 关闭文件,结束联合仿真引擎 |
执行机制
- 源码:
|
|
- 输出结果
UVM_INFO @0: uvm_test_top.t1 [build_phase]
UVM_INFo @0: uvm_test_top.t1.c1 [build_phase】
UVM_INFO @0: uvm_test_top.t1.c2 [build_phase]
UVM_INFO @0: uvm_test_top.t1.cl [connectJphase]
UvM_INFO @0: uvm_test_top.t1.c2 [connect_phase]
UVM_INFO @0: uvm_test_top.t1 [connect_phase]
UVM_INFO @0: uvm_test_top.t1.c1 [end_of_elaboration_phase]
UVM_INFO @0: uvm_test_top.t1.c2 [end_of_elaboration_phase]
UVM_INFO @0: uvm_test_top.t1 [end_of_elaboration_phase]
UVM_INFO @O: uvm_test_top.t1.c1 [start_of_simulation_phase]
UVM_INFO @0: uvm_test_top.t1.c2 [start_of_simulation_phase]
UVM_INFO @0: uvm_test_top.t1.   [start_of_simulation_phase]
UVM_INFO @O: uvm_test_top.t1.c1 [run_phase]
UVM_INFO @0: uvm_test_top.t1.c2 [run_phase]
UVM_INFO @0: uvm_test_top.t1.   [run_phase]
UVM_INFO @O: uvm_test_top.t1.c1 [extract_phase]
UVM_INFO @0: uvm_test_top.t1.c2 [extract_phase]
UVM_INFO @0: uvm_test_top.t1.   [extract_phase]
UVM_INFO @O: uvm_test_top.t1.c1 [check_phase]
UVM_INFO @0: uvm_test_top.t1.c2 [check_phase]
UVM_INFO @0: uvm_test_top.t1.   [check_phase]
UVM_INFO @O: uvm_test_top.t1.c1 [report_phase]
UVM_INFO @0: uvm_test_top.t1.c2 [report_phase]
UVM_INFO @0: uvm_test_top.t1.   [report_phase]
UVM_INFO @O: uvm_test_top.t1.c1 [final_phase]
UVM_INFO @0: uvm_test_top.t1.c2 [final_phase]
UVM_INFO @0: uvm_test_top.t1.   [final_phase]
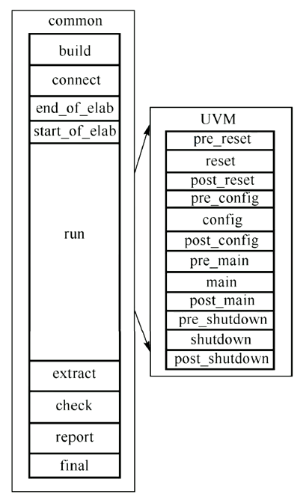
9个主要phase
- 上面的九个phase对于一个测试环境的生命周期而言,是有固定的先后执行顺序的;同时对于同一个phase中的组件,执行也会按照层次的顺序或者自顶向下、或者自底向上来执行。
- 对于 build phase,执行顺序按照自顶向下 ,这符合验证结构建设的逻辑。因为只有先例化高层组件,才会创建空间来容纳低层组件。
- 只有uvm_component及其继承于uvm_component的子类,才会按照phase机制将上面的九个phase先后执行完毕。
- 常用的phase包括build、connect、run和report,它们分别完成了组件的 建立、连接、运行和报告 。这些phase在uvm_component中通过_phase的后缀完成了虚方法的定义,比如build_phase()可以定义一些 组件例化和配置的任务 。
- 在所有phase中, 只有run_phase方法是一个可以耗时的任务,这意味着该方法可以完成一些等待、激励、采样的任务。对于其它phase对应的方法都是函数, 必须立即返回(0耗时)
- 在run_phase中, 用户如果要完成测试, 通常需要组织下面的激励序列:
- 上电
- 复位
- 寄存器配置
- 发送主要测试内容
- 等待DUT完成测试
12个分之phase
- 在用户发送激励的 一种简单方式是,在run_phase中完成上面所有的激励;另外一种方式是,如果用户可以将上面几种典型序列划分到不同区间,让对应的激励按区间顺序发送的话,可以让测试更有层次 。因此run_phase又可以分为下面12个phase:
- pre_reset_phase
- reset_phase
- post_reset_phase
- pre_configure_phase
- configure_phase
- post_configure_phase
- pre_main_phase
- main_phase
- post_main_phase
- pre_shutdown_phase
- shutdown_phase
- post_shutdown_phase
- 实际上run_phase任务和上面细分的12个phase是 并行 的,即在start_of_simulation_phase任务执行以后,run_phase和reset_phase开始执行,而在shutdown_phase执行完成之后,需要等待run_phase执行完才可以进入extract_phase。
UVM编译和运行顺序
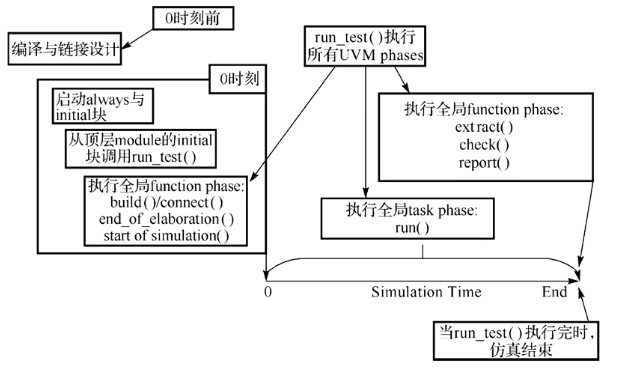
UVM仿真开始
- 要在仿真开始时建立验证环境,用户可以考虑选择下面几种方式:
- 可以通过全局函数(由uvm_pkg提供) run_test() 来选择性地指定要运行哪一个uvm_test。这里的test类均继承于uvm_test。这样的话, 指定的test类将被例化并指定为顶层的组件。一般而言,run_test()函数可以在合适的module/program中的initial进程块中调用。
- 如果没有任何参数传递给run_test(),那么用户可以在仿真时通过传递参数 +UVM_TEST NAME=<test_name> ,来指定仿真时调用的uvm_test。当然,即便run_test()函数在调用时已经有test名称传递,在仿真时+UVM_TEST NAME=<test_name>也可以从顶层覆盖已指定的test。这种方式使得仿真不需要通过再次修改run_test()调用的test名称和重复编译,就可以灵活选定test。
- 无论上面哪一种方式,都必须在顶层调用全局函数run_test(),用户可以考虑不传递test名称作为参数,而在仿真时通过传递参数+UVM_TESTNAME=<test_name>来选择test。
- 全局函数run_test()的重要性,正是从uvm_root创建了一个UVM世界 。
UVM世界的"诞生”
|
|
- UVM顶层类uvm_root。 该类也继承于uvm_component ,它也是UVM环境结构中的一员,而它可以作为顶层结构类。
- 它提供了一些像run_test()的这种方法,来充当了UVM世界中的核心角色。
- 在uvm_pkg中, 有且只有一个顶层类uvm_root所例化的对象,即uvm_top 。
- uvm_top(也就是uvm_root)承担的核心职责包括:
- 作为隐形的UVM世界顶层,任何其它的组件实例都在它之下,通过创建组件时指定parent来构成层次。
- 如果parent设定为null,那么它将作为uvm_top的子组件。
- phase控制。控制所有组件的phase顺序。
- 索引功能。通过层次名称来索引组件实例。
- 报告配置。通过uvm_top来全局配置报告的繁简度(verbosity) 。
- 全局报告设备。由于可以全局访问到uvm_top实例, 因此UVM报告设备在组件内部和组件外部(例如module和sequence) 都可以访问。
- 通过uvm_top调用方法run_test(test_name),uvm_top做了如下的初始化:
- 得到正确的test_name。
- 初始化objection机制(控制仿真退出)。
- 创建uvm_test_top实例。
- 调用phase控制方法,安排所有组件的phase方法执行顺序。
- 等待所有phase执行结束, 关闭phase控制进程。
- 报告总结和结束仿真。
UVM仿真结束
- UVM-1.1之后, 结束仿真的机制有且只有一种,那就是利用objection挂起机制来控制仿真结束 。
- uvm_objection类提供了一种供所有component和sequence共享的计数器。 如果有组件来挂起 *objection,那么它还应该记得落下objection 。
- 参与到objection机制中的组件,可以独立的各自挂起objection,来防止run phase退出,但是只有这些组件都落下objection后,uvm_objection共享的counter才会变为0,这意味run phase退出的条件满足,因此可以退出run phase。
- 对于uvm_objection类,用来反停止的控制方法包括:
- raise_objection(uvm_object obj=null, string description=”", int count=1) 挂起objection
- drop_objection(uvm_object obj=null, string description=”", int count=1) 落下objection
- set_drain_time(uvm_object obj=null, time drain) 设置退出时间
- 对这几种方法,在实际应用中的建议有:
- 对于component()而言,用户可以在run_phase()中使用phase.raise_objection()/phase.drop_objection()来控制run phase退出。
- 用户最好为description字符串参数提供说明,这有利于后期的调试。
- 应该使用默认count值。
- 对于uvm_top或者uvm_test_top应该尽可能少地使用set_drain_time() 。
objection防止仿真退出
|
|
- 如果要在component中挂起objection,建议在一进入run_phase()后就挂起,保证objection counter及时被增加。
- 另外,用户需要习惯在sequence中挂起objection,由于sequence不是uvm_component类,而是uvm_object类,因此它只有body()方法,而没有run_phase()方法。
- 所以在sequence中使用objection机制时,可以在body()中的首尾部分挂起和落下objection。
config机制
写在前头
- 在验证环境的创建过程build phase中, 除了组件的实例化,配置也是必不可少的 。
- 为了验证环境的复用性,通过外部的参数配置,使得环境在创建时可以根据不同参数来选择创建的组件类型、组件实例数目、组件之间的连接以及组件的运行模式等。
- 在更细致的环境调节(environment tuning)中有更多的变量需要配置,例如for-loop的阈值、字符串名称、随机变量的生成比重等。
- 比起重新编译来调节变量,如果在仿真中可以通过变量设置来修改环境,那么就更灵活了,而UVM config机制正提供了这样的便捷。
- 在UVM提供了uvm_config_db配置类以及几种方便的变量设置方法来实现仿真时的环境控制,常见的uvm_config_db类的使用方式包括:
- 传递virtual interface到环境中
- 设置单一变量值,例如int、string、enum等
- 传递配置对象(config object)到环境
|
|
interface传递
- interface传递可以很好地解决了连接硬件世界和软件世界。
- 而在之前SV验证模块中,虽然SV可以通过层次化的interface的索引来完成了传递,但是这种方式不利于软件环境的封装和复用。
- UVM的uvm_config_db使得接口的传递和获取彻底分离开来。
- 在实现接口传递的过程中需要注意:
- 接口传递应该发生在run_test()之前 。这保证了在进入build phase之前,virtual interface已经被传递到uvm_config_db中。
- 用户应当把interface与virtual interface的声明区分开来,在 传递过程中的类型应当为virtual interface ,即实际接口的句柄。
|
|
变量设置
- 在各个test中,可以在build_phase对底层组件变量加以配置,进而在环境例化之前完成配置,使得环境可以按照预期运行。
|
|
- 注意细节: 先传递后创建
object传递
- 在test配置中,需要配置的参数不只是数量多,而且可能还分属于不同的组件。
- 那么如果对这么多层次中的变量做出类似上面的变量设置,那会需要更多的代码,容易出错还不易于复用,甚至底层组件的变量被删除后, 也无法通过uvm_config_db::set()得知配置是否成功。
- 然而如果将每个组件中的变量加以整合,首先放置到一个uvm_object中,再对中心化的配置对象进行传递,那么将会更有利于整体环境的修改维护。
|
|
总结
- 在使用uvm_config_db::set()/get()时,实际发生了这些后台操作:
- uvm_config_db::set()通过层次和变量名,将这些信息放置到uvm_pkg唯一的全局变量uvm_pkg::uvm_resources.
- 全局变量uvm_resources用来存储和释放配置资源信息(resource information) 。uvm_resources是uvm_resource_pool类的全局唯一实例,该实例中有两个resource数组用来存放配置信息,这两个数组中一个由层次名字索引,一个由类型索引,通过这两个关联数组可以存放通过层次配置的信息。
- 同时,底层的组件也可以通过层次或者类型来取得来自高层的配置信息。这种方式使信息的配置和获取得到剥离,便于调试复用。
- 在使用uvm_config_db::get()方法时,通过传递的参数构成索引层次,然后在uvm_resource已有的配置信息池中索引该配置,如果索引到,方法返回1,否则返回0。
建议
- 在使思set()/get()方法时,传递的参数类型应当上下保持一致。对于uvm_object等实例的传递如果get型与set类型不一致,应当首先通过$cast()完成类型转换,再对类型转换后的对象进行操作。
- set()/get()方法传递的参数可以使用通配符“*”来表示任意的层次,类似于正则表达式的用法。同时用户需要懂得“*.comp1”与“*comp1”的区别,前者表示在目前层次以下所有名称为“comp1”的组件,而后者表示包括当前层次及当前层次以下所有名为“comp1”的组件。
- 在module环境中如果要使用uvm_config_db::set(),则传递的第一个参数uvm_component_cntxt参数用来表示当前的层次。如果当前的层次为最高层,用户可以设置为null,也可以设置为uvm_root::get()来表示uvm_root的全局顶层实例。
- 在使用配置变量时,应当确保先进行uvm_config_db::get()操作,在获得了正确的配置值以后再使用。
- 应当尽量确保uvm_config_db::set()方法在相关配置组件创建前调用。这是因为只有先完成配置,相关组件在例化前才可以得到配置值继而正确地例化。
- 在set()方法第一个参数使用当前层次的前提下,对于同一组件的同一个变量,如果有多个高层组件对该变量进行设置,那么较高层组件的配置会覆盖较低层的配置,但是如果是同一层次组件对该变量进行多次配置时,应该遵循后面的配置会覆盖前面的配置。
- 用户应该在使用uvm_config_db::get()方法时, 添加便于调试的语句,例如通过UVM报告信息得知get()方法中的配置变量是否从uvm_confog_db获取到,如果没有获取,是否需要采取其他措施。
消息管理
写在前头
- 在一个好的验证系统应该具有消息管理特性,它们是:
- 通过一种标准化的方式打印信息
- 过滤(重要级别)信息
- 打印通道
- 这些特性在UVM中均有支持, UVM提供了一系列丰富的类和方法来生成和过滤消息:
- 消息方法
- 消息处理
- 消息机制
消息方法
- 在UVM环境中或者环境外,只要有引入uvm_pkg,均可以通过下面的方法来按照消息的严重级别和冗余度来打印消息。
|
|
- 四个消息函数有若干共同的信息,它们是 严重级别(severity) 、冗余度(verbosity) 、消息ID、消息、文件名和行号 :
- 严重级别:从函数名本身也可以得出,这四个严重级别分别是UVM_INFO、UVM_WARNING、UVM_ERROR、UVM_FATAL。不同的严重级别在打印的消息中也会有不同的指示来区别,同时仿真器对不同严重级别消息的处理方式也不一样。例如对于UVM_FATAL的消息,默认情况下仿真会停止。
- 消息ID:该ID可以是任意的字符串,用来标记该消息。这个标记会同消息本身打印出来,同时不同的标记也可以用来进行消息处理。
- 消息:即消息文本的主体。
- 冗余度:冗余度与消息处理中的过滤直接相关。冗余度的设置如果低于过滤的开关,那么该消息会打印出来,否则不会被打印出来。但是无论信息是否会被打印出来,这都与对消息采取的其它措施没有关系,例如仿真停止。
- 文件名和行号:这些信息用来提供消息发生时所在的文件和行号。用户可以使用默认值, 而UVM后台会自动填补它们原本的文件名和行号, 同时也在打印时将文件名和行号输出。
消息处理
- 与每一条消息对应的是如何处理这些消息。通常情况下,消息处理的方式是同消息的严重级别对应的。如果用户有额外的需求,也可以修改对各个严重级别的消息处理方式。
| 处理方式 | 说明 |
|---|---|
| NO_ACTION | 不做任何处理 |
| UVM_DISPLAY | 将消息输出到标准输出端口 |
| UVM_LOG | 将消息写入到文件 |
| UVM_COUNT | 增加退出计算变量quit_count,达到一定数值时则停止仿真 |
| UVM_EXIT | 立刻停止仿真 |
| UVM_CALL_HOOK | 调用对应的回调函数 |
| UVM_STOP | 停止仿真 |
- 不同的严重级别消息,用户可以使用默认的消息处理方式
| 严重级别 | 默认处理方式 |
|---|---|
| UVM_INFO | UVM_DISPLAY |
| UVM_WARNING | UVM_DISPLAY |
| UVM_ERROR | UVM_DISPLAY & UVM_COUNT |
| UVM_FATAL | UVM_DISPLAY & UVM_EXIT |
消息宏
- 如果要做自定义的消息处理方式,用户可以通过uvm_report_object类提供的方法进行配置。
- uvm_report_object类是间于uvm_object类与uvm_component类之间的中间类,它的主要功能是完成消息打印和管理。
- UVM也提供了一些宏来对应上面的消息方法,用户也可以使用这些宏来处理消息。
| 方法调用 | 宏调用 |
|---|---|
| uvm_report_info() | `uvm_info(ID, MESSAGE, VERBOSITY) |
| uvm_report_warning() | `uvm_warning(ID, MESSAGE) |
| uvm_report_error() | `uvm_error(ID, MESSAGE) |
| uvm_report_fatal() | `uvm_fatal(ID, MESSAGE) |
消息机制
- 消息处理是由uvm_report_handler类来完成的,而每一个uvm_report_object类中都有一个uvm_report_handler实例。
- 上面的uvm_report_object消息处理方法或者uvm_component消息处理方法, 都是针对于这些uvm_report_handler做出的配置。
- 除了上面的常见使用方法,用户还可以做出更高级的消息控制。例如,当UVM_ERROR出现之后,仿真默认会停止,这是由于设置了UVM_ERROR的处理方式是UVM_COUNT数量达到上限(默认为1),即停止仿真。可以通过set_max_quit_count来修改UVM_COUNT值。
回调函数
- 消息用户在处理信息时还希望做出额外的处理,这时回调函数就显得很有必要了,uvm_report_object类提供了下面的回调函数满足用户更多的需求:
|
|
- report_hook(函数通过结合消息管理时的UVM_CALL_HOOK参数,结合用户自定义的回调函数,就可以实现更丰富的配置。
- 这样用户在调用回调函数时,首先会调用report_hook()函数,接下来才按照severity级别来选择更细致的回调函数report_SEVERITY_hook() 。
- 默认情况下,report_hook()函数返回值为1,进而再转入severity hook函数。
- 如果report_hook()函数由用户自定义且返回0的话,那么后续report_SEVERITY_hook()函数不会执行。
|
|
消息管理
- report_hook() 函数通过结合消息管理时的UVM_CALL_HOOK参数,结合用户自定义的回调函数,就可以实现更丰富的配置。
- 这样用户在调用回调函数时,首先会调用report_hook()函数,接下来才按照severity级别来选择更细致的回调函数report_SEVERITY_hook() 。
- 默认情况下,report_hook()函数返回值为1,进而再转入severity hook函数。
- 如果report_hook()函数由用户自定义且返回0的话,那么后续report_SEVERITY_hook()函数不会执行。
文章原创,可能存在部分错误,欢迎指正,联系邮箱 cao_arvin@163.com。